DarioSantarelli.Blog(this);

ASP.NET SignalR and Ext.NET MessageBus

Posted by dariosantarelli on October 20, 2013


Most of the modern web applications provides real-time functionalities (“real-time web“) through a set of technologies and practices that enable users to receive information as soon as it is published by its authors, rather than requiring that they or their software check a source periodically for updates.  Moreover, in very scalable and complex architectures, server-side code execution is often asynchronous. Just for example, let’s think to a task-based UI which submits a command like “book a plane ticket” to a web service. The server-side command processing could be performed after some hours: for example, the command could be just enqueued to a command-bus to be processed later. In scenarios like that, the client can’t count on an updated read model just after sending the command. As a consequence, in order to receive a feedback as soon as possible, all the involved clients should poll the server until the command execution reaches a significant state (e.g. in progress, completed, canceled etc.) and the read model is updated, ready for queries.

Before WebSockets, the classic implementations of this kind of real-time features were not so easy and they used to adopt strategies like forever frame (see “Comet“) or periodic/long polling. Today, all the modern browsers and web servers fully support WebSockets and they can extabilish bi-directional and persistent communications, so that a client can receive content through a “push” action performed by the server. In the ASP.NET world, SignalR is a growing new library that uses WebSockets under the covers when it’s available, and gracefully fallbacks to other techniques and technologies when it isn’t, while the application code stays the same. SignalR also provides a very simple, high-level API for doing server-to-client RPC (call JavaScript functions in clients’ browsers from server-side code) in an ASP.NET application, as well as adding useful hooks for connection management, e.g. connect/disconnect events, grouping connections, authorization.

Developers that are currently using the Ext.NET component framework can take advantage on SignalR by combining it with the Ext.NET MessageBus component. The MessageBus provides a simple and robust client-side infrastructure to propagate notifications to listening UI components. The reference scenario I’m talking about in this post is represented in the figure below:


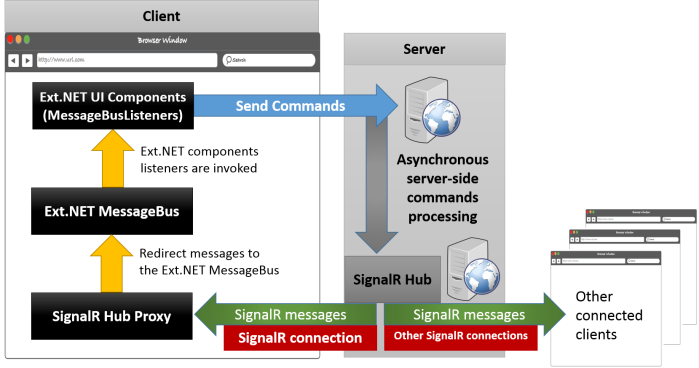
1. The client browser extabilishes a persistent connection to a server-side SignalR application hub. After that the client mantains a reference to an auto-generated hub proxy.
2. The Ext.NET UI components submits commands to the server.
3. At any time of the server-side command execution, the server can use the SignalR hub to push notification messages back to all the involved clients via RPC.
4. Any client receiving a SignalR message through the hub proxy redirects the message to the Ext.NET Message Bus
5. On the basis of the specific type of message, the Ext.NET UI components are updated through a message handler function. In fact, each Ext.NET component has a MessageBusListeners property (client side handlers of MessageBus client side events) and a MessageBusDirectEvents property (server side handlers of MessageBus client side events).

Let’s have a look to a minimalistic example implemented in an ASP.NET MVC web application. Here’s the view :

@using Ext.Net;
@using Ext.Net.MVC;
@{
    Layout = null;
    var X = Html.X();
}
<!DOCTYPE html>
<html>
    <head>        
        <title>SignalR and Ext.NET MessageBus example</title>
        @Scripts.Render("~/bundles/modernizr")
        @Scripts.Render("~/bundles/jquery")
        @Scripts.Render("~/bundles/jquery.signalR")
        <script src="@Url.Content("~/signalr/hubs")" type="text/javascript"></script>
    </head>
<body>
@(X.ResourceManager())
@(X.Viewport().Padding(20).Items()

.Add(X.Button().Icon(Icon.Add).Text("New customer")
      .DirectClickAction("AddCustomer", "Customers")) 

.Add(X.Button().Icon(Icon.Delete).Text("Delete customer")
      .DirectClickAction("DeleteCustomer", "Customers"))

.Add(X.GridPanel().Title("Customers").MarginSpec("10 0 0 0").Icon(Icon.User)
      .Store(X.Store()
              .AutoLoad(true)
              .Proxy(X.AjaxProxy().Url("/customers/all").Reader(X.JsonReader()))
              .Model(X.Model()
                      .Fields(fields =>
                      {
                        fields.Add(X.ModelField().Name("Id"));
                        fields.Add(X.ModelField().Name("Name"));
                        fields.Add(X.ModelField().Name("Surname"));
                        fields.Add(X.ModelField().Name("Email"));
                      })))
              .ColumnModel(columnModel =>
              {
                columnModel.Columns.Add(X.Column().Text("Name").DataIndex("Name").Flex(1));
                columnModel.Columns.Add(X.Column().Text("Surname").DataIndex("Surname").Flex(1));
                columnModel.Columns.Add(X.Column().Text("Email").DataIndex("Email").Flex(1));
              })
              .MessageBusListeners(new MessageBusListener 
              {   
                 Name = "Customers.*",
                 Handler = "this.getStore().reload();",
                 Buffer = 500
              }))

.Add(X.GridPanel().Title("Events log").MarginSpec("10 0 0 0").Icon(Icon.Report)
      .Store(X.Store()
      .Model(X.Model()
              .Fields(fields =>
                          {
                              fields.Add(X.ModelField().Name("EventId"));
                              fields.Add(X.ModelField().Name("DateTime"));
                              fields.Add(X.ModelField().Name("Name"));
                              fields.Add(X.ModelField().Name("Data"));
                          })))
                    .ColumnModel(columnModel =>
                    {
                        columnModel.Columns.Add(X.Column().Text("EventId").DataIndex("EventId").Flex(1));
                        columnModel.Columns.Add(X.Column().Text("DateTime").DataIndex("DateTime").Flex(1));
                        columnModel.Columns.Add(X.Column().Text("Event name").DataIndex("Name").Flex(1));
                        columnModel.Columns.Add(X.Column().Text("Event data").DataIndex("Data").Flex(1));
                    })
                    .MessageBusListeners(new MessageBusListener
                    {
                        Name = "Customers.*",
                        Handler = "this.getStore().add({ EventId: data.Id, DateTime: getFormattedDateTime(), 
                                   Name: name, Data: \"CustomerId: \" + data.CustomerId });"
})))
<script type="text/javascript">      
var loadHub = function () {
    var hubProxy = $.connection.applicationHub;
    hubProxy.client.publish = function (name, message) {
        Ext.net.Bus.publish(name, message);
    };
    $.connection.hub.start().done(function () {
        Ext.net.Notification.show({
            title: "Info",
            iconCls: "#Accept",
            html: "SignalR connection is active!"
        });
    });
};

$(document).ready(function () {
    loadHub();
});

</script>    
</body>
</html>

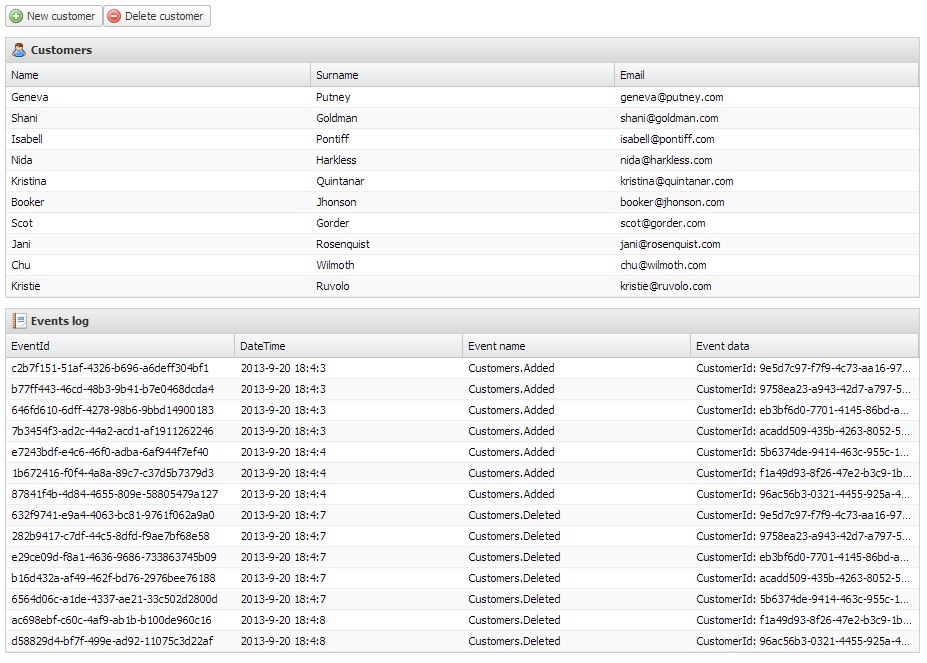
As you can see, the view is composed by the following Ext.NET components:

– A couple of buttons which send commands to the server (e.g. Add/Remove a customer)
– A grid panel which holds the current customer data
– A grid panel which holds trace data about messages received through the SignalR connection.

The integration between the client-side SignalR hub proxy and the Ext.NET components MessageBus is done through the loadHub javascript function: it wraps the SignalR hub named “applicationHub” so that all the received messages are redirected to the Ext.NET MessageBus and again to the listening UI components. Please note that the SignalR “publish” function and the Ext.NET MessageBus “publish” function accept the same parameters: the message name and the message data. For this reason, the integration between the two worlds is practically natural.

In the example above, the Store of the former GridPanel is reloaded each time its MessageBusListener intercepts any message whose name starts with the prefix “Customers.” . Please pay attention to the Buffer property: it’s very useful when the component is under message storming and we want the UI to be refreshed just after a specified delay during which no messages have been received.

What about server-side code? Well, the server-side code is not so relevant in this post. The most important thing to be considered here is that at some point of the server-side command execution, the code retrieves the SignalR hub, selects which clients will receive the RPC (for simplicity, in this example a message is sent to all connected clients) and finally pushes a message containing the data the client needs for updating UI. Here an example:

GlobalHost.ConnectionManager.GetHubContext<ApplicationHub>()
          .Clients.All.publish("Customers.Added", new CustomerAdded { ...<data for clients>... });

Useful links

Posted in .NET Framework, AJAX, ASP.NET, ASP.NET MVC, C#, Microsoft Technology, Programming, Web Development | Tagged: , , , , , , , | 1 Comment »

Two new projects released!

Posted by dariosantarelli on March 22, 2013


I’ve just published two new projects I’ve worked on in the last months:

LogLive

LogLive is free software for Windows written in .NET (WPF 4) that enables you to perform real-time monitoring on different types of log sources through components called “listeners”.

TextTableFormatter.NET

TextTableFormatter is a .NET porting of Java TextTableFormatter.
This library renders tables made of characters. The user add cells and can add format characteristics like predefined/custom table styles, text alignment, abbreviation, column width, border types, colspan, etc.

In the next months I will publish other projects, so please stay tuned! 🙂

Posted in .NET Framework, About Me..., Microsoft Technology, Programming, WPF | Leave a Comment »

C# dynamic dispatch and class inheritance

Posted by dariosantarelli on December 8, 2012


I believe dynamic dispatch is a very cool feature of C# 4.0. It was designed to simplify interop between statically typed C# and dynamically typed languages or COM components by deferring method resolution at runtime, dynamically applying the same overload selection logic that the C# compiler would normally use at compile time. This feature is known as single/multiple dispatch. A common usage of this technique can be found in many implementations of the visitor pattern. Maybe you have already read something like this:

public class MessageHandler
{
    public void HandleMessage(Message message)
    {
        ProcessMessage((dynamic)message);
    }
    protected void ProcessMessage(MessageA messageA)
    {
        Console.WriteLine("MessageA processed");
    }

    protected void ProcessMessage(MessageB messageB)
    {
        Console.WriteLine("MessageB processed");
    }
}

This code works great when you don’t know the exact type beforehand and you don’t want to use a big switch statement. If you use dynamic dispatch within the same class everything should work as expected. So, if you execute the following lines of code..

var messageHandler = new MessageHandler();
messageHandler.HandleMessage(new MessageA());
messageHandler.HandleMessage(new MessageB());

…the console output would be the following:

MessageA processed
MessageB processed

OK, but what happens if you introduce a class derived from MessageHandler in order to separate message handling?

The problem

Let’s suppose to have an DefaultMessageHandler that holds the fallback message handling method and a DerivedMessageHandler which holds methods for some specific messages.

public abstract class Message { }
public class MessageA : Message { }
public class MessageB : Message { }
public class MessageC : Message { }

public class DefaultMessageHandler
{
    public void HandleMessage(Message message)
    {
        ProcessMessage((dynamic)message);
    }

    protected void ProcessMessage(Message message)
    {
        Console.WriteLine("Message processed");
    }

    protected void ProcessMessage(MessageA messageA)
    {
        Console.WriteLine("MessageA processed");
    }
}

public class DerivedMessageHandler : DefaultMessageHandler
{
    protected void ProcessMessage(MessageB messageB)
    {
        Console.WriteLine("MessageB processed");
    }

    protected void ProcessMessage(MessageC messageC)
    {
        Console.WriteLine("MessageC processed");
    }
}

When we try to execute the following lines of code…

var messageHandler = new DerivedMessageHandler();
messageHandler.HandleMessage(new MessageA());
messageHandler.HandleMessage(new MessageB());
messageHandler.HandleMessage(new MessageC());

…the console output is…

MessageA processed
Message processed
Message processed

The problem here is that every call to the ProcessMessage method via dynamic dispatch is linked to the only implementation of the method that is found in the DefaultMessageHandler class, and the ones in the derived classes will never be executed. At first glance, this behaviour could be not so easy to expect.

A simple solution

In order for our code to work as expected we could just override the HandleMessage method in the DerivedMessageHandler class, leaving it exactly the same as the one defined in the base class. As alternative, we could completely move the HandleMessage method to derived classes.

public class DefaultMessageHandler
{
    public virtual void HandleMessage(Message message)
    {
        ProcessMessage((dynamic)message);
    }

    protected void ProcessMessage(Message message)
    {
        Console.WriteLine("Message processed");
    }

    protected void ProcessMessage(MessageA messageA)
    {
        Console.WriteLine("MessageA processed");
    }
}

public class DerivedMessageHandler : DefaultMessageHandler
{
    public override void HandleMessage(Message message)
    {
        ProcessMessage((dynamic)message);
    }

    protected void ProcessMessage(MessageB messageB)
    {
        Console.WriteLine("MessageB processed");
    }

    protected void ProcessMessage(MessageC messageC)
    {
        Console.WriteLine("MessageC processed");
    }
}

Now, if we try to handle specific messages…

var messageHandler = new DerivedMessageHandler();
messageHandler.HandleMessage(new MessageA());
messageHandler.HandleMessage(new MessageB());
messageHandler.HandleMessage(new MessageC());
messageHandler.HandleMessage(new MessageD());

…everything works as expected and the console output is

MessageA processed
MessageB processed
MessageC processed
Message processed // fallback for MessageD

Please note that the fallback overload of the ProcessMessage method has been invoked for MessageD because a specific overload has not been dinamically found by the runtime binder.

Posted in .NET Framework, C#, Microsoft Technology, Programming | Tagged: , , , | 2 Comments »

[WPF] From Visual to Bitmap

Posted by dariosantarelli on October 21, 2012


I’d like to share a couple of extension methods that helped me in situations where I needed to convert some rendered WPF windows or controls to bitmaps. Many devs know how complex this task was in Windows Forms. Instead, in WPF it’s quite simple, at least if you’re familiar with the RenderTargetBitmap class, and the range of BitmapEncoders. In order to convert a visual to a bitmap, I like to see something like this:

myVisual.ToBitmapSource().ToPngFile(@”C:\ScreenShot.png”);

The ToBitmapSource() extension method allows you to get a single, constant set of pixels at a certain size and resolution representing the visual (please note that a BitmapSource uses automatic codec discovery, based on the installed codecs on the user’s system). I’ve always found useful to replace the default black background that WPF reserves for transparency with a custom brush. So I introduced the transparentBackground parameter (default: white) which overrides the default black one.

public static BitmapSource ToBitmapSource(this Visual visual, Brush transparentBackground)
{
  var bounds = VisualTreeHelper.GetDescendantBounds(visual);
  var bitmapSource = new RenderTargetBitmap((Int32)bounds.Width, (Int32)bounds.Height, 96, 96, PixelFormats.Pbgra32);
  var drawingVisual = new DrawingVisual(); 
  using (var drawingContext = drawingVisual.RenderOpen())
  {
    var visualBrush = new VisualBrush(visual);
    drawingContext.DrawRectangle(transparentBackground, null, new Rect(new Point(), bounds.Size));
    drawingContext.DrawRectangle(visualBrush, null, new Rect(new Point(), bounds.Size));
  }

  bitmapSource.Render(drawingVisual);
  return bitmapSource;
}

public static BitmapSource ToBitmapSource(this Visual visual)
{
  return visual.ToBitmapSource(Brushes.White);
}

public static void ToPngFile(this BitmapSource bitmapSource, string fileName)
{
  var encoder = new PngBitmapEncoder();
  encoder.Frames.Add(BitmapFrame.Create(bitmapSource));
  using (var file = File.Create(fileName)) encoder.Save(file);
}

Posted in .NET Framework, C#, Microsoft Technology, WPF | Tagged: , | 1 Comment »

Unity Interception Extension

Posted by dariosantarelli on September 30, 2012


Starting from Enterprise Library 5.0, Unity supports interception mechanisms which captures the call to an object at invocation time and provides the full implementation of the object through lightweight code generation (ILEmit). It’s something very similar to the aspect-oriented programming (AOP) approach.

However, Unity is NOT an AOP framework implementation for the following reasons:

  • It uses interception to enable only preprocessing behaviors and post-processing behaviors.
  • It does not insert code into methods, although it can create derived classes containing policy pipelines.
  • It does not provide interception for class constructors.

Instance Interception VS Type Interception

With instance interception, when the application resolves the object through the container,

  1. The Unity interception container obtains a new or an existing instance of the object and creates a proxy.
  2. Then it creates the handler pipeline and connects it to the target object before returning a reference to the proxy.
  3. The client then calls methods and sets properties on the proxy as though it were the target object.

Interface interception

With type interception , the container uses a derived class instead of a proxy (it  resembles AOP techniques). Type interception avoids the possible performance penalties of using a proxy object by dynamically deriving a new class from the original class, and inserting calls to the behaviors that make up the pipeline. When the application resolves the required type through the Unity container,

  1. the Unity interception container extension creates the new derived type and passes it, rather than the resolved type, back to the caller.
  2. Because the type passed to the caller derives from the original class, it can be used in the same way as the original class.
  3. The caller simply calls the object, and the derived class will pass the call through the behaviors in the pipeline just as is done when using instance interception.

Type Interception

However, there are some limitations with this approach. It can only be used to intercept public and protected virtual methods, and cannot be used with existing object instances. In general, type interception is most suited to scenarios where you create objects especially to support interception and allow for the flexibility and decoupling provided by policy injection, or when you have mappings in your container for base classes that expose virtual methods.

Interceptors and Behaviors

Unity uses an Interceptor class to specify how interception happens, and an InterceptionBehavior class to describe what to do when an object is intercepted. There are three built-in interceptors in Unity:

  • VirtualMethodInterceptor: a type based interceptor that works by generating a new class on the fly that derives from the target class. It uses dynamic code generation to create a derived class that gets instantiated instead of the original, intercepted class and to hook up the call handlers. Interception only happens on virtual methods. You must set up interception at object creation time and cannot intercept an existing object.
  • InterfaceInterceptor:  an instance interceptor that works by generating a proxy class on the fly for a single interface. It can proxy only one interface on the object. It uses dynamic code generation to create the proxy class. Proxy supports casting to all the interfaces or types of the target object. It only intercepts methods on a single interface. It cannot cast a proxy back to target object’s class or to other interfaces on the target object.
  • TransparentProxyInterceptor: an instance interceptor that uses remoting proxies to do the interception. When the type to intercept is a MarshalByRefObject or when only methods from the type’s implemented interfaces need to be intercepted. The object must either implement an interface or inherit from System.MarshalByRefObject. If the marshal by reference object is not a base class, you can only proxy interface methods. TheTransparentProxy process is much slower than a regular method call.

Interception is based on one or a pipeline of behaviors that describe what to do when an object is intercepted. You can create your own custom behaviors by implementing the IInterceptionBehavior interface. The interception behaviors are added to a pipeline and are called for each invocation of that pipeline, as shown below.

Here an example of interception behavior which intercepts a call to a method and logs some useful info if the call throws an exception internally:

public class ExceptionLoggerInterceptionBehavior : IInterceptionBehavior
{
  private readonly ILogger _logger;
 

  public ExceptionLogInterceptionBehavior(ILogger logger)
  {
    _logger = logger;
  }
 
  public IEnumerable<Type> GetRequiredInterfaces() return Type.EmptyTypes; }

  public IMethodReturn Invoke(IMethodInvocation input, GetNextInterceptionBehaviorDelegate getNext)    
  {
      IMethodReturn result = getNext()(input, getNext);

      if (result.Exception != null)
      {
        _logger.Log(string.Format(“Exception occurred in {0}.\nParameters: {1}\nException: {2},
                               input.MethodBase,
                               string.Join(“,”, input.Inputs.Cast<object>()),
                               result.Exception));
      }
      return result;
  }
 
  public bool WillExecute
  {
    get { return true; }
  }
}

In detail, you must provide an implementation of the two IInterceptionBehavior interface methods, Invoke() and GetRequiredInterfaces(), and set the WillExecute property.

  • The WillExecute property indicate if the behavior perform any operation when invoked. This is used to optimize interception. If the behaviors won’t actually do anything (for example, PIAB where no policies match) then the interception mechanism can be skipped completely.
  • The GetRequiredInterfaces method returns the interfaces required by the behavior for the intercepted objects. The Invoke method execute the behavior processing.
  • The Invoke method has two parameters: input and getNext. The input parameter rapresents the current call to the original method, the getNext parameter is a delegate to execute to get the next delegate in the behavior chain.

Now let’s see an example of usage.  The following code executes a statement that makes my IService implementation raise an ArgumentNullException. This exception will be logged thanks to the ExceptionLoggerInterceptionBehavior registered for my IService interface.

new UnityContainer()
    .AddNewExtension<Interception>()
    .RegisterType<ILogger, ConsoleLogger>()
    .RegisterType<IService, Service>(new Interceptor<InterfaceInterceptor>(),
                                     new InterceptionBehavior<ExceptionLoggingInterceptionBehavior>())
.Resolve<IService>()
.Process(null); // It throws ArgumentNullException!!!

If we open the Console output window we’ll find something like this…

Exception occurred in MyNamespace.Response Process(MyNamespace.Request).
Parameters:
Exception: System.ArgumentNullException: Value cannot be null.
Parameter name: request
at MyNamespace.Service.Process(Request request) in …
at DynamicModule.ns.Wrapped_IService_1cccb54f8a8b4109a353b589ea96c30e.<Process_DelegateImplementation>__0(IMethodInvocation inputs, GetNextInterceptionBehaviorDelegate getNext)

A first chance exception of type ‘System.ArgumentNullException’ occurred in Unity_ILEmit_InterfaceProxies

Posted in .NET Framework, C#, Microsoft Technology, Programming | Tagged: , , | 1 Comment »

Unity container and the Decorator Pattern

Posted by dariosantarelli on September 12, 2012


In these days I’m using Unity as IoC and DI container in a project. One of the “must-have” features of a modern container is the ability to be configured at runtime, preferably with a  fluent mapping registration interface. Moreover, one of the expected features is the support for decorator or chain object pattern configurations with intuitive code. A simple scenario could be something like this:

public interface IService {}

public class Service : IService {}

public class ServiceDecorator : IService
{
  protected IService DecoratedService { get; private set; }

  public ServiceDecorator(IService service)
  {
    DecoratedService = service;
  }
}

The intent is straightforward and quite common: registering the relationship between the Service and the ServiceDecorator class, so when someone asks for an IService, he gets a Service instance wrapped in a ServiceDecorator instance. Let’s have a look at the most used solutions.


Solution 1: Using an InjectionConstructor

Well, configuring the Unity container to support a decorator in the old-fashioned way requires some not so much readable code. In fact, making this work seems a kind of magic.

[TestMethod]
public void UnityContainer_Should_Resolve_The_ServiceDecorator_With_InjectionConstructor()
{
  var container = newUnityContainer();
  container.RegisterType<IService, Service>(“Service”);
  container.RegisterType<IService,ServiceDecorator>(
                new InjectionConstructor(new ResolvedParameter(typeof(IService), “Service”)));
 
  var service = container.Resolve<IService>();
  Assert.IsInstanceOfType(service, typeof(ServiceDecorator));

}

I think the code above is not optimal, because it uses magic strings.  It also has a dangerous disadvantage: changes to the ServiceDecorator constructors will generate runtime instead of compile time errors.


Solution 2: Using an InjectionFactory

This is a substantial improvement of the previous solution. It allows to specify a factory function which can use the injected container to explicitly resolve eventual dependencies to decorated/decorator constructors.

[TestMethod]
public void UnityContainer_Should_Resolve_The_ServiceDecorator_With_InjectionFactory()
{
 var container = new UnityContainer();
 Func<IUnityContainer, object> factoryFunc = c => new ServiceDecorator(new Service(
       // Here you can use the container to resolve further dependencies…
 ));

 container.RegisterType<IService>(new InjectionFactory(factoryFunc));

 var service = container.Resolve<IService>();
 Assert.IsInstanceOfType(service, typeof(ServiceDecorator));
}

The downside is that code still needs updating every time a new constructor parameter is added to Service or ServiceDecorator class. But now we have three noticeable advantages:

  • code is much easier to understand
  • only a single registration into the container is required
  • changes to the constructors will generate compile time instead of runtime errors.


Solution 3: Using a custom Unity Container Extension

You can use a container extension like this DecoratorContainerExtension in order to use the same convention available for example in the Castle Windsor container:

[TestMethod]
public void UnityContainer_Should_Resolve_The_ServiceDecorator_With_DecoratorContainerExtension()
{
  var container = new UnityContainer();
  container.AddNewExtension<DecoratorContainerExtension>();
  container.RegisterType<IService, ServiceDecorator>();
  container.RegisterType<IService, Service>(); 
 
  var service = container.Resolve<IService>();
  Assert.IsInstanceOfType(service, typeof(ServiceDecorator));
}

This is absolutely my favourite solution.  It’s less code, and most importantly it describes the intent in a better way, because it’s focused on the developer’s object model and not the on the Unity’s one.

Posted in .NET Framework, C#, Microsoft Technology, Programming | Tagged: , , | Leave a Comment »

Experimenting with Ext.NET support for Razor: a GridPanel with AJAX proxy

Posted by dariosantarelli on June 2, 2012


In these days I’m having fun experimenting the Razor View Engine support introduced in Ext.NET v.2.0 (Beta3 at the time of writing) and I’m appreciating how fluently you can configure any Ext.NET component. Nowadays there isn’t a good documentation about these new features (on Ext.NET official site you can read “Server-side Ext.NET API documentation is being worked on”) so if you want more info about Razor support please have a look at the Ext.NET official forum (I’ve found this thread particularly helpful!). Moreover, in the Ext.NET Examples Explorer you can try to get the necessary knowledge for translating WebForms code examples into Razor views.
In this post I’d like to show one of my first tests: a simple GridPanel supporting server-side data paging via AJAX proxy.
Here the interesting Razor syntax:

@Html.X().ResourceManager()
@(Html.X().GridPanel()
        .Title("Customers")
        .Store(store => store.Add(Html.X().Store()
            .AutoLoad(true)
            .RemoteSort(false)
            .IsPagingStore(true)
            .RemotePaging(true)
            .PageSize(20)
            .Proxy(proxy => proxy.Add(Html.X().AjaxProxy()
                            .Url("/Customers/GetCustomers")
                            .Reader(reader => reader.Add(Html.X().JsonReader()
                                                                   .Root("data")
                                                                   .TotalProperty("total")
                                                                   .IDProperty("CustomerID")))))
            .Model(model => model.Add(Html.X().Model()
                        .Fields(fields =>
                        {
                            fields.Add(Html.X().ModelField().Name("CustomerID"));
                            fields.Add(Html.X().ModelField().Name("ContactName"));
                            fields.Add(Html.X().ModelField().Name("CompanyName"));
                            fields.Add(Html.X().ModelField().Name("Phone"));
                            fields.Add(Html.X().ModelField().Name("Fax"));
                            fields.Add(Html.X().ModelField().Name("Region"));
                        })))))
        .ColumnModel(columnModel =>
        {
            columnModel.Columns.Add(Html.X().Column().Text("ContactName").DataIndex("ContactName").Flex(1));
            columnModel.Columns.Add(Html.X().Column().Text("CompanyName").DataIndex("CompanyName").Flex(1));
            columnModel.Columns.Add(Html.X().Column().Text("Phone").DataIndex("Phone"));
            columnModel.Columns.Add(Html.X().Column().Text("Fax").DataIndex("Fax"));
            columnModel.Columns.Add(Html.X().Column().Text("Region").DataIndex("Region"));
        })
        .BottomBar(bar => bar.Add(Html.X().PagingToolbar()
                                          .DisplayInfo(true)
                                          .DisplayMsg("Displaying customers {0} - {1} of {2}")))
        .View(view => view.Add(Html.X().GridView())))


First of all, please note the Html.X() helper method. This is the entry point for configuring any Ext.NET component. As requisite for getting started, you can call the Html.X().ResourceManager() helper method. Like the counterpart of Ext.NET for WebForms, it automatically injects every script and stylesheet you need into your page. The output should be something like this:

<link type="text/css" rel="stylesheet" href="/extjs/resources/css/ext-all-gray-embedded-css/ext.axd?v=25767" />   
<link type="text/css" rel="stylesheet" href="/extnet/resources/extnet-all-embedded-css/ext.axd?v=25767" />
<script type="text/javascript" src="/extjs/ext-all-js/ext.axd?v=25767"></script>
<script type="text/javascript" src="/extnet/extnet-all-js/ext.axd?v=25767"></script> 

OK, now through the Html.X() helper you can start configuring the GridPanel. In my example I have an AjaxProxy which calls a controller action in order to get back some JSON data to bind to the GridPanel. Some point of interest:

  • start and limit are the two standard ExtJs querystring parameters sent by the proxy to the remote data source in order to tell it how to page data.
  • AjaxProxy can process the resulting JSON via a JsonReader. In particular, pay attention to the Root() and TotalProperty() methods. They tell the reader respectively which root property in the JSON response contains the data rows and which property contains the total results count. They are two fundamental info for the right grid rendering.

Finally, the controller action code:

public ActionResult GetCustomers(int start, int limit)
{
    IEnumerable dtoArray;
    int total;

    using (var unitOfWork = _unitOfWorkFactory.Create())
    {
        var customerRepository = _repositoryFactory.CreateCustomerRepository(unitOfWork);
        var customers = customerRepository.Query()
                                          .Skip(start)
                                          .Take(limit);

         dtoArray = (from customer in customers
                        select new
                                {
                                    customer.CustomerID,
                                    customer.CompanyName,
                                    customer.ContactName,
                                    customer.Phone,
                                    customer.Fax,
                                    customer.Region
                                }).ToArray();

         total = customerRepository.Query().Count();
    }

    return Json(new { data = dtoArray, total = total }, JsonRequestBehavior.AllowGet);
}


Posted in AJAX, ASP.NET, ASP.NET MVC, C#, Programming, Web Development | 8 Comments »

Using MEF in a Request/Response Service Layer

Posted by dariosantarelli on December 30, 2011


In a project of mine I’m using a simple Request/Response service layer very similar to the amazing Davy Brion’s Agatha project. Everything started a few time ago when I was searching for a smart way to design a client-server infrastructure which was focused on messages and not on operations. This layer would be not only a classic WCF-based service, but also a some kind of in-process facade to my business layer where I could centralize any cross cutting concern. So I was focused on the capability of moving my service layer and its business logic to a separate machine and hosting it through WCF without any significant modifications to my code (admitting that service layer doesn’t share state with upper layers like the presentation layer). After reading Davy’s “Why I Dislike Classic Or Typical WCF Usage” , I was convinced to address myself to one service contract with one service operation, avoiding to spend time thinking about how to design and implement service contracts and operations. In this way, the first (great) advantage I got is that I can add functionalities simply defining a request message, a response message and a request handler which executes the logic needed between a request receiving and a response sending. Very simple and effective!

Overview of the service layer

Everything starts from an interface called IRequestHandler:

public interface IRequestHandler 
{
  Response HandleRequest(Request request);
}

Request and Response are empty base abstract classes:

public abstract class Request {}
public abstract class Response {}

Now let’s define a simple rule: every concrete request type must be corresponded by a concrete response type. The idea is to basically consider each service operation as a request which must have a response. For each request you define, you need to provide an handler which does whatever it needs to do to handle the request and returns a response. In my solution, a simple generic base request handler has been defined in the following way:

public abstract class RequestHandlerBase<TRequest, TResponse> : IRequestHandler 
                                                              where TRequest : Request 
                                                              where TResponse : Response 
{
    public Response HandleRequest(Request request)
    {
        return HandleRequest((TRequest)request);
    }

    public abstract TResponse HandleRequest(TRequest request);
}

For example, by inheriting this RequestHandlerBase base class, we could create a login request handler, which implements the business logic for validating a user:

public class LoginRequestHandler : RequestHandlerBase<LoginRequest, LoginResponse>
{
    public override LoginResponse HandleRequest(LoginRequest request)
    {
      // validate the user credentials contained in the LoginRequest 
      // and return a LoginResponse containing, for example, a session token 
    }
}

Having each request handler implemented in the same fashion as the LoginRequestHandler, I’d like to reach a service implementation like this:

public class MyService : IRequestHandler 
{
    private readonly IRequestHandlerProvider _requestHandlerProvider;

    public MyService(IRequestHandlerProvider requestHandlerProvider)
    {
        _requestHandlerProvider = requestHandlerProvider;
    }

    public Response HandleRequest(Request request)
    {
        return _requestHandlerProvider.GetRequestHandler(request.GetType()).HandleRequest(request);
    }
}

As you can see, the service itself implements the IRequestHandler interface and the actual implementation is very minimal: it’s just a small class which resolves the appropriate handler through an abstraction called IRequestHandlerProvider which internally may use an IoC container capable of resolving the request handler associated to a request type. Then, the service delegates the execution to an handler by passing the request to it, and finally it returns a typed response to the client.

Enter MEF

Now we could need a IoC container to resolve and create the instances of the request handlers. As shown in this post, you can use the Castle Windsor IoC container to use dependency injection. That basically allows you to register each valid request handler that is present, for example, in a given assembly. Even my purpose was to find a simple way to plug in request handlers defined in external assemblies, getting everything registered automatically in a centralized request handler provider when the application starts up. So, I was focused on MEF. What I tried to do is to treat each request handler as an extension, because in my project each tuple “Request-Response-Handler” represents an extension unit. Moreover,

  • MEF is an integral part of the .NET Framework 4
  • MEF offers a set of discovery approaches for locating and loading available extensions even in a “lazy” fashion
  • MEF allows tagging extensions with additonal metadata which facilitates rich querying and filtering so an extensibility element can provide metadata to exported items.

Following this philosophy, beyond the classic Export attribute I introduced a RequestHandlerMetadataAttribute useful for simplifying the process of resolving an handler related to a specific request type. So, the LoginRequestHandler defined before could be decorated as the following…

[Export(typeof(IRequestHandler))] // I am a request handler!!!
[RequestHandlerMetadata(typeof(LoginRequest))] // I can handle Login requests!!!
public class LoginRequestHandler : RequestHandlerBase<LoginRequest, LoginResponse>
{
  ... 
}

And here is the RequestHandlerMetadataAttribute definition.

public interface IRequestHandlerMetadata 
{
    Type RequestType { get; }
}

[MetadataAttribute]
[AttributeUsage(AttributeTargets.Class, AllowMultiple = false)]
public class RequestHandlerMetadataAttribute : ExportAttribute 
{
    public Type RequestType { get; set; }

    public RequestHandlerMetadataAttribute(Type requestType)
        : base(typeof(IRequestHandlerMetadata))
    {
        RequestType = requestType;
    }
}

In order to allow us to access the metadata, MEF introduces a special kind of Lazy<T,M> that has attached metadata. M in this case is an interface (called “metadata view”) that contains only getter properties. MEF automatically generates a proxy class that implements this interface and it plugs all the metadata in for us. This is very cool! What is happening behind the scenes is that MEF is using reflection emit in order to construct the typed metadata view.

As result, I’ve used the metadata view IRequestHandlerMetadata to easily find the right handler for a request of a given type, as shown in the GetRequestHandler() method of the following MefRequestHandlerProvider.

public class MefRequestHandlerProvider : IRequestHandlerProvider 
{
    private readonly List<Lazy<IRequestHandler, IRequestHandlerMetadata>> _registeredHandlers =
                                              new List<Lazy<IRequestHandler, IRequestHandlerMetadata>>();

    public MefRequestHandlerProvider(IEnumerable<ComposablePartCatalog> catalogs)
    {
        foreach (var catalog in catalogs)
        {
            var container = new CompositionContainer(catalog);
            var exportedHandlers = container.GetExports<IRequestHandler, IRequestHandlerMetadata>();

            foreach (var exportedHandler in exportedHandlers)
            {
                foreach (var registeredHandler in _registeredHandlers)
                {
                    if (registeredHandler.Metadata.RequestType == exportedHandler.Metadata.RequestType)
                        throw new NotSupportedException(string.Format("A request handler for type {0} is already registered.",
                                                                      exportedHandler.Metadata.RequestType));
                }
            }

            _registeredHandlers.AddRange(exportedHandlers);
        }
    }

    public IRequestHandler GetRequestHandler(Type requestType)
    {
        var handler = _registeredHandlers.SingleOrDefault(r => r.Metadata.RequestType == requestType);
        if (handler != null) return handler.Value;
        throw new RequestHandlerNotFoundException(string.Format("No request handler has been found for type {0}", requestType));
    }
}

Putting all together, in the application startup I placed the following initialization code which uses the MefRequestHandlerProvider. As you may know, request handlers can be located inside catalogs (e.g. AssemblyCatalog, AggregateCatalog etc.). When using a client proxy, I need to expose just one method which never needs to be updated. That’s a good advantage!

// Server-Side 
var catalog = new AssemblyCatalog(typeof(IRequestHandler).Assembly);
var mefRequestHandlerProvider = new MefRequestHandlerProvider(new[] { catalog });
MyService service = new MyService(mefRequestHandlerProvider);

// Client-Side (when using a proxy)
LoginResponse response = (LoginResponse)serviceProxy.HandleRequest(new LoginRequest("username", "password"));
Console.WriteLine(response.AccessToken);

Conclusion

In this post I’ve tried to show how I used MEF to plug request handlers in a request/response service layer similar to Agatha. I have not written anything about serialization issues when exposing the service layer through WCF. Moreover, I haven’t treated any aspects about request handlers such as objects lifecycles or error management. I think that any question about these service layer insights can find good answers after reading the Davy Brion’s Request/Response Service Layer Series.

HTH

Posted in .NET Framework, Microsoft Technology, Programming | Tagged: , | 1 Comment »

[Entity Framework v4] Identity map pattern

Posted by dariosantarelli on November 26, 2011


One of the most important pattern that a good ORM technology should support in order to face the object-relational impedance mismatch is the Identity Map pattern. It’s just one of a set of conceptual and technical difficulties emerging when objects or class definitions are mapped in a straightforward way to database tables or relational schemas.

What’s Identity Map?

In Martin Fowler’s book “Patterns of Enterprise Application Architecture”, the Identity Map is defined as a way of ensuring “that each object gets loaded only once by keeping every loaded object in a map. Looks up objects using the map when referring to them.”  If the requested data has already been loaded from the database, the identity map has to return the same instance of the already instantiated object and if it has not been loaded yet, it should load it and stores the new object in the map. In this way, it follows a similar principle to lazy loading. As result, the Identity Map design pattern introduces a consistent way of querying and persisting objects (e.g. through a context-specific in-memory cache) which prevents applications from duplicate retrievals of the same object data from the database.

Ok, in order to better understand this concept, let’s start from a non-Identity Map example. If we have an application that uses a simple persistence layer that performs a database query and then materializes one or more objects, we might see code that creates different instances of the same logical entity:

[TestMethod]
public void Non_IdentityMap_Solution_Provides_Different_Copies_Of_The_Same_Customer()
{
    Customer customer1 = DAL.Customers.GetCustomerById("dsantarelli");
    Customer customer2 = DAL.Customers.GetCustomerById("dsantarelli");

    // customer1 and customer2 should represent the same customer...         
    Assert.AreEqual(customer1.CustomerId, customer2.CustomerId);
    Assert.AreEqual(customer1.Email, customer2.Email);

    // ... but they are two separate instances!     
    Assert.IsFalse(customer1 == customer2);

    // If we change a property of customer1... 
    customer1.Email = "xxx@yyy.zzz";

    // ... then, which instance should be valid?  
    Assert.AreNotEqual(customer1.Email, customer2.Email);
}

In this example, customer1 and customer2 both contain separate copies of the data for the same customer. If we change the data in customer1, the change has no effect on customer2. If we make changes to both and then save them back to the database, one just overwrites the changes of the other. That’s because our persistence framework just doesn’t know that customer1 and customer2 both contain data for the same logical entity.

Conclusion: multiple objects containing data for the same entity, lead to concurrency problems when it’s time to save data.

How does Entity Framework approach the Identity Map pattern?

Now let’s have a look at the Identity Map way! In the unit test below, we have some Entity Framework code in which three different object queries are executed in order to get data for the same customer:

[TestMethod]
public void EF_IdentityMap_Solution_Provides_References_To_The_Same_Instance_Of_Customer()
{
    using (EFContext context = new EFContext())
    {
        Customer customer1 = context.Customers.Single(c => c.CustomerId == "dsantarelli");
        Customer customer2 = context.Customers.Single(c => c.Email == "dario@santarelli.com");
        Customer customer3 = context.Customers.First(c => c.ContactName == "Dario Santarelli");

        // The three queries above should return the same customer.  
         // So, customer 1,2 and 3 are references to the same instance of Customer. 
        Assert.IsTrue(customer1 == customer2);
        Assert.IsTrue(customer2 == customer3);

        // Now if we change a property of customer1... 
        customer1.Email = "xxx@yyy.zzz";

        // ... then customer 1,2 and 3 still remain valid references to the same instance of Customer. 
         Assert.AreEqual(customer1.Email, customer2.Email);
        Assert.AreEqual(customer2.Email, customer3.Email);
    }
}

How you can see, now all 3 customers are equal. Moreover, when we change a property on customer1, we get that same change on customer2 and customer3. In fact, they’re all references to a single object that is managed by the EF’s ObjectContext. Behind the scenes EF ensures that only one entity object is created and the multiple entities that we try to load are just multiple references to that one object, regardless of how many times or how many different are the ways we load an entity. This is a behavior compliant with the Identity Map pattern!

The key is EntityKey

So how does this work?  First of all, every entity type has a key that uniquely identifies that entity.

If your Customer entity inherits from EntityObject (which is the base class for all data classes generated by the Entity Data Model tools) or simply implements the IEntityWithKey interface, in the debugger you’ll notice that Customer has a property that EF created for you named EntityKey (which corresponds to the primary key in the database). EntityKey contains data about all the information ObjectContext needs in order to maintain an Identity Map. You could think of the map as a “cache” that contains only one instance of each object identified by its EntityKey.

REMEMBER: Entity Framework v4 does not require you to implement IEntityWithKey in a custom data class especially if you use POCO entities.

In the previous example, when we get customer1 from our context, by default EF runs the query, creates an instance of Customer (uniquely identified by its key CustomerId), stores that object in the cache, and gives us back a reference to it. When we get customer2 from the context, the context does run the query again and pulls data from our database, but then it sees that it already has a customer entity with the same EntityKey in the cache so it throws out the data and returns a reference to the entity that’s already in cache. The same thing happens for customer3.

So how many database queries EF will perform if we write something like this?

Customer customer1 = context.Customers.Single(c => c.CustomerId == "dsantarelli");
Customer customer2 = context.Customers.Single(c => c.CustomerId == "dsantarelli");
Customer customer3 = context.Customers.Single(c => c.CustomerId == "dsantarelli");

The answer is: three.

Wait… if there’s a cache, why is it performing three queries? The second part of Martin Fowler’s definition of Identity map says “… looks up objects using the map when referring to them”. An obvious question is: if I’m loading an object that already exists in my cache, and EF is just going to return a reference to that cached object and throw away any changes it gets from the database query, can’t I just get the object directly from my cache and skip the database query altogether? That could really reduce database load.

The answer is: you could explicitly get an entity directly from the cache without hitting the database, but only if you use a special method to get the entity by its EntityKey. Here an example:

EntityKey entityKey = new EntityKey("EFContext.Customers", "CustomerId", "dsantarelli");
object customerObj;
if (context.TryGetObjectByKey(entityKey, out customerObj))
{
    // the customer has been found in the cache Customer customer = (Customer)customerObj;
}

What about if we don’t know the actual value of an EntityKey? Well, we can’t use this feature.

In fact, having to use the EntityKey is a big limitation since most of the time you want to look up data by some other field and not by a primary key which could be a Guid or another data type impossible to know.

Identity Map and MergeOptions

Now two interesting questions:

Can I customize the strategy that EF uses to compare the datasource values and the cache entities values?
What happens to cached entities when the underlying database rows change?

Suppose to have the following code:

Customer customer1 = context.Customers.Single(c => c.CustomerId == "dsantarelli");
// Now someone changes the customer1 record in the DB!!! 
Customer customer2 = context.Customers.Single(c => c.CustomerId == "dsantarelli");

After customer1 is loaded, someone changes the record in the DB. Will customer2 have the original values, or the new values? Remember that customer1 and customer2 are references to the same entity object in the cache, and our first db hit when we got customer1 did pull the original value, but then the query for customer2 also hit the database and pulled data. How does EF handle that? The answer is: it depends on the MergeOption enumeration. The possible options are:

AppendOnly (default) : It simply throws the new data out. If an object is already in the context, the current and original values of object’s properties in the entry are not overwritten with data source values. The state of the object’s entry and state of properties of the object in the entry do not change and Identity Map is guaranteed. Here’s a test example:

[TestMethod]
public void EF_AppendOnly_MergeOption_Throws_NewData_Away()
{
    using (EFContext context = new EFContext())
    {
        context.Customers.MergeOption = MergeOption.AppendOnly;

        Customer customer1 = context.Customers.Single(c => c.CustomerId == "dsantarelli");
        Assert.AreEqual(customer1.ContactName, "Dario Santarelli");

        // Now someone changes the customer1 record in the DB
        // by setting ContactName = "Luigi Santarelli" !!!
        ChangeDBRecord("dsantarelli" , "Luigi Santarelli");

        Customer customer2 = context.Customers.Single(c => c.CustomerId == "dsantarelli");

        Assert.IsTrue(customer1 == customer2); // They are references to the same Customer instance (Identity Map)
        Assert.AreEqual(customer2.ContactName, "Dario Santarelli");  // Original values win! }
}

OverwriteChanges: Unlike the AppendOnly option, it applies new data. If an object is already in the context, the current and original values of object’s properties in the entry are overwritten with data source values, ignoring every changes we make in the meanwhile. Identity Map principle is still preserved.

[TestMethod]
public void EF_OverwriteChanges_MergeOption_Applies_NewData()
{
    using (EFContext context = new EFContext())
    {
        context.Customers.MergeOption = MergeOption.OverwriteChanges;

        Customer customer1 = context.Customers.Single(c => c.CustomerId == "dsantarelli");
        Assert.AreEqual(customer1.ContactName, "Dario Santarelli");

        // Now someone changes the customer1 record in the DB 
        // by setting ContactName = "Luigi Santarelli" !!! 
        ChangeDBRecord("dsantarelli" , "Luigi Santarelli");

        customer2 = context.Customers.Single(c => c.CustomerId == "dsantarelli");

        Assert.IsTrue(customer1 == customer2); // They are references to the same instance (Identity Map) 
        Assert.AreEqual(customer2.ContactName, "Luigi Santarelli"); // New values win }
}

NoTracking : In this scenario, objects are not tracked in the ObjectStateManager. Each time we hit the DB for getting a customer, the EF provides a new instance of the Customer class. So, in this case, the Identity Map principle is broken (we can find some analogies with the non-Identity Map solution presented at the beginning of this post).

[TestMethod]
public void EF_NoTracking_MergeOption_Applies_NewData_And_Provides_Different_Copies_Of_The_Same_Customer()
{
    using (EFContext context = new EFContext())
    {
        context.Customers.MergeOption = MergeOption.NoTracking;

        Customer customer1 = context.Customers.Single(c => c.CustomerId == "dsantarelli");
        Assert.AreEqual(customer1.ContactName, "Dario Santarelli");

        // Now someone changes the customer1 record in the DB
        // by setting ContactName = "Luigi Santarelli" !!!
        ChangeDBRecord("dsantarelli", "Luigi Santarelli");

        Customer customer2 = context.Customers.Single(c => c.CustomerId == "dsantarelli");

        Assert.IsFalse(customer1 == customer2); // They are NOT references to the same instance (NO Identity Map) 
        Assert.AreEqual(customer1.ContactName, "Dario Santarelli"); // customer1 has original values 
        Assert.AreEqual(customer2.ContactName, "Luigi Santarelli"); // customer2 has new values }
}

PreserveChanges : this option is quite a compromise between the AppendOnly and the OverwriteChanges options.

  • If we don’t change any property of our entity (i.e. the state of the entity is Unchanged), the current and original values in the entry are overwritten with data source values. The state of the entity remains Unchanged and no properties are marked as modified.
  • If we change a property of our entity (i.e. the state of the entity is Modified), the current values of modified properties are not overwritten with data source values. The original values of unmodified properties are overwritten with the values from the data source.
  • Entity Framework v4 compares the current values of unmodified properties with the values that were returned from the data source. If the values are not the same, the property is marked as modified.

So, let’s see this behavior in a test…

[TestMethod]
public void EF_PreserveChanges_MergeOption_Preserves_Client_Changes()
{
    using (EFContext context = new EFContext())
    {
        context.Customers.MergeOption = MergeOption.PreserveChanges;

        Customer customer1 = context.Customers.Single(c => c.CustomerId == "dsantarelli");
        Assert.AreEqual(customer1.ContactName, "Dario Santarelli");

        customer1.ContactName = "Carlo Santarelli"; // We change the ContactName in memory

        // Now someone changes the customer1 record in the DB
        // by setting ContactName = "Luigi Santarelli" !!!
        ChangeDBRecord("dsantarelli", "Luigi Santarelli");

        Customer customer2 = context.Customers.Single(c => c.CustomerId == "dsantarelli");

        Assert.IsTrue(customer1 == customer2); // They are references to the same instance (Identity Map) 
        Assert.AreEqual(customer2.ContactName, "Carlo Santarelli"); // Our changes are preserved! }
}

HTH

Posted in Entity Framework | Tagged: , , | Leave a Comment »

[WPF] Registering the “pack://” scheme in unit tests

Posted by dariosantarelli on August 26, 2011


A while ago I tried to test some WPF resources stored in an assembly (BAML). When I tried to execute the following code in a unit test…

[TestMethod]

public void MyStyle_Should_Be_Loaded()

{           

  ResourceDictionary dictionary = new ResourceDictionary();

  dictionary.Source = new Uri(“pack://application:,,,/TestClassLibrary;component/ResourceDictionary.xaml”,

                              UriKind.RelativeOrAbsolute);

  object style = dictionary[“myStyle”];


  Assert.IsNotNull(style);

  Assert.IsTrue(style is Style);

}

… I received the following strange error while trying to instantiate the Uri class…

System.UriFormatException: Invalid URI: Invalid port specified.

But why?
The answer is not so obviuos. That’s because I was executing that code while the pack:// scheme wasn’t yet registered. In fact, this scheme is registered when the Application object is created. The very simple solution is to execute the following code just before executing the test…

[TestInitialize
public void OnTestInitialize() 
{   
   if (!UriParser.IsKnownScheme("pack")) new System.Windows.Application();
} 
 

HTH

Posted in .NET Framework, WPF | 2 Comments »

[WPF] Inheritance and DataTemplates

Posted by dariosantarelli on July 28, 2011


In this post I will show how different DataTemplates related to a hierarchy of classes can be nested and, therefore, reused. The concept is very simple, but its applications in a real scenario could be not so trivial!

Let’s assume to have a base ViewModel useful for editing and saving an object of your model. If the object class is subject to some derivations, maybe you’d like to derive your base ViewModel too in order to fulfill the model inheritance hierarchy. Moreover, most probably you have to define different editing views taking into account the whole inheritance hierarchy. In that case, maybe you’d like to reuse more XAML as possible.

So, let’s assume to have a base abstract Customer class and some concrete specializations, like EducationCustomer and GovernmentCustomer (see image below).   Customer class hierarchyThen, we design ViewModels in order to edit concrete instances of Customer class. In the class diagram below you can see a base ItemEditViewModel<T> which consists in a simple generic ViewModel which exposes a generic Item to be modified and a SaveCommand to persist it somewhere. The class also defines an abstract method OnCanSaveItem() which a concrete implementation must override in order to specify its own validation rules.   ViewModel hierarchy

public abstract class CustomerEditViewModel<T> : ItemEditViewModel<T> where T : Customer
{
 public CustomerEditViewModel(T customer) : base(customer) { }
 public CustomerEditViewModel() { } 

 protected override bool OnCanSaveItem() 
 {
 if (Item == null)  return false; 
 return (!string.IsNullOrWhiteSpace(Item.Name) && !string.IsNullOrWhiteSpace(Item.Email)); 
 } 
}

public class EducationCustomerEditViewModel : CustomerEditViewModel<EducationCustomer> 
{
 public EducationCustomerEditViewModel() : base() { }
 public EducationCustomerEditViewModel(EducationCustomer customer) : base(customer) { } 

 protected override bool OnCanSaveItem() 
 {
 if (!base.OnCanSaveItem()) return false;
 else return (!string.IsNullOrWhiteSpace(Item.SchoolName)); 
 } 
}  

public class GovernmentCustomerEditViewModel : CustomerEditViewModel<GovernmentCustomer>
{
  public GovernmentCustomerEditViewModel() : base() { }
  public GovernmentCustomerEditViewModel(GovernmentCustomer customer) : base(customer) { }

  protected override bool OnCanSaveItem()
  {
   if (!base.OnCanSaveItem()) return false;
   else return (!string.IsNullOrWhiteSpace(Item.AgencyName));
  }
}

Ok, we have just defined model and viewmodels. Now the interesting part! Our datatemplates could share some portions of XAML (e.g. the edit DataTemplate of the GovernmentCustomer is quite identical to the DataTemplate of the EducationCustomer, but it differs from the former just for a field). So, how can we reuse DataTemplates? First, we can define the edit DataTemplate for the base Customer class…

<DataTemplate x:Key="customerEditTemplate" DataType="{x:Type m:Customer}">
  <Grid>
    ...
    <TextBlock Text="Name" ... />
    <TextBox Text="{Binding Path=Name, Mode=TwoWay}" ... Background="AliceBlue" />
    <TextBlock Text="Email" ... />
    <TextBox Text="{Binding Path=Email, Mode=TwoWay}" ... Background="AliceBlue" />
  </Grid>
</DataTemplate>

 
and then, we can reuse the XAML above in the edit DataTemplate for the GovernmentCustomer and the EducationCustomer.

<DataTemplate x:Key="governmentCustomerEditTemplate" DataType="{x:Type m:GovernmentCustomer}">
  <StackPanel>
    <ContentPresenter ContentTemplate="{StaticResource customerEditTemplate}" />
    <Grid>
    ...
     <TextBlock Text="Agency" ... />
     <TextBox Text="{Binding Path=AgencyName, Mode=TwoWay}" ... Background="LightPink" />
   </Grid>
  </StackPanel>
</DataTemplate>

<DataTemplate x:Key="educationCustomerEditTemplate" DataType="{x:Type m:EducationCustomer}">
  <StackPanel>
    <ContentPresenter ContentTemplate="{StaticResource customerEditTemplate}" />
    <Grid>
      ...
      <TextBlock Text="School" ... />
      <TextBox Text="{Binding Path=SchoolName, Mode=TwoWay}" ... Background="Yellow" />
    </Grid>
  </StackPanel>
</DataTemplate>

 
OK, that’s all. Finally, a simple view can be implemented as below…

<Window ...>
  <Window.Resources>
    <m:GovernmentCustomer x:Key="governmentCustomer" />
    <m:EducationCustomer x:Key="educationCustomer" />
    <vm:GovernmentCustomerEditViewModel x:Key="governmentCustomerEditVM" Item="{StaticResource governmentCustomer}" />
    <vm:EducationCustomerEditViewModel x:Key="educationCustomerEditVM" Item="{StaticResource educationCustomer}" />
  </Window.Resources>


  <StackPanel DataContext="{StaticResource governmentCustomerEditVM}" Margin="10">
    <ContentPresenter Content="{Binding Path=Item}" ContentTemplate="{StaticResource governmentCustomerEditTemplate}" />
    <Button Content="Save"Command="{Binding Path=SaveItemCommand}"... />
  </StackPanel>
</Window>

 
As you can see, in this example the edit DataTemplate is referenced by key, but in a real scenario you can define your own mechanism to bind the right ViewModel to a DataTemplate for the Item to be edited and saved. In this example, the output result is the following

EducationCustomer edit WindowGovernmentCustomer edit Window

HTH

Posted in WPF | 1 Comment »

[.NET Compact Framework] Working with Point-to-Point Message Queues

Posted by dariosantarelli on June 11, 2011


While working on a project of mine, I’ve got to face an interprocess communication (IPC) on a Windows CE device. In my scenario, the device vendor uses the Message Queue Point-To-Point infrastructure so that native processes can communicate with managed processes through IPC. On other Windows platforms, IPC can be achieved through named pipes (native) or remoting (managed), but none of these options are available to Windows CE. Point-to-point represents a little-known IPC mechanism that is efficient, flexible, and unique to Windows CE version 4.0 and later. Moreover it can interact with the operating system, for example, for getting power information.

If you don’t know this feature of Windows CE, first of all you should read this MSDN article:

Point-to-Point Message Queues with the .NET Compact Framework.

After analyzing the managed wrapper proposed by the article, I’ve started to refactor the source code in order to make it more suitable for my needs. So, I’d like to share my design and implementation :).

Let’s explain some key concepts:

  • A message queue can be addressed by a name or, generally, by an handle. The handle is the only data you can refer to if the queue has no name (NULL). Note that the empty string is considered a valid, non-null name.
  • A message queue can be read-only or write-only: it means that a process can get an handle to a message queue just for reading or writing messages. If you want to read from and write to the same queue, you should create two handles pointing to the same queue.
  • Message queues are FIFO. Writers can write messages in a queue until it’s full and readers can read messages from a queue until it’s empty. When a reader process invokes a read operation on a message queue, the first unread message is removed from the queue and delivered to the reading process.

As you can see in the class diagram above, I’ve defined an abstract MessageQueue class which holds the queue info ( e.g. the max length, the max message length, the current readers/writers count and so on… ) and exposes a generic factory method for creating concrete implementations.

public static T Create<T>(string name) where T : MessageQueue
public static T Create<T>(string name, int length) where T : MessageQueue
public static T Create<T>(string name, int length, int maxMessageLength) where T : MessageQueue

Let’s have a look to them:

WriteOnlyMessageQueue

It’s a concrete class for writing messages in a queue. The class exposes some overloads of the Write() method in order to write a message in a queue and choose whether to block the calling thread until the message is written in the queue (that is the queue is not full).

// Create or open an infinite user-defined write-only MessageQueue
WriteOnlyMessageQueue writeOnlyMessageQueue = MessageQueue.Create<WriteOnlyMessageQueue>(“MyQueueName”);

Message message = new Message(UTF8Encoding.UTF8.GetBytes(“Hello world!”));


// WRITE OPTIONS
// 1. block the current thread until a message can be written into the queue (that is the queue is not full).
writeOnlyMessageQueue.Write(message, true);


// 2. block the current thread for a max of 200 ms. If the message can’t be written during this interval, throw an exception.
try { writeOnlyMessageQueue.Write(message, 200); } catch (Exception ex) { }


// 3. don’t block the current thread. If a message can’t be written immediately, throw an exception.
try { writeOnlyMessageQueue.Write(message, false); } catch (Exception ex) { }

ReadOnlyMessageQueue

It’s a concrete class for reading messages from a queue. The class exposes some overloads of the Read() method in order read a message from a queue and choose whether to block the calling thread until a message can be read from the queue (that is the queue is not empty).

// Create or open an infinite user-defined read-only MessageQueue
ReadOnlyMessageQueue readOnlyMessageQueue = MessageQueue.Create<ReadOnlyMessageQueue>(“MyQueueName”);
Message message = null;

// READ OPTIONS
// 1. block the current thread until a message can be read from the queue.
message = readOnlyMessageQueue.Read(true);

// 2. block the current thread for a max of 200 ms. If no message has been read during this interval, throw an exception.
try { message = readOnlyMessageQueue.Read(200); } catch (Exception ex) { … }

// 3. don’t block the current thread. If a message can’t be read immediately, throw an exception.
try { message = readOnlyMessageQueue.Read(false); } catch (Exception ex) { … }

AutoReadOnlyMessageQueue

It’s a concrete class derived from ReadOnlyMessageQueue. It uses a monitoring thread useful to automatically read messages after they are written in the queue. So, the class exposes a MessageRead event which is fired for each message read from the queue.

// Create or open an infinite user-defined read-only MessageQueue
AutoReadOnlyMessageQueue autoReadOnlyMessageQueue = MessageQueue.Create<AutoReadOnlyMessageQueue>(“MyQueueName”);

// Starts monitoring the queue.
// New messages will be read automatically and notified through the MessageRead event.
autoReadOnlyMessageQueue.Start();
autoReadOnlyMessageQueue.MessageRead += (s, e) => { byte[] messageBytes = e.Message.Bytes; }; 

Another static method exposed by the MessageQueue class is OpenByHandle().  It allows you to open a  MessageQueue by using its handle. This method is suitable to open unnamed queues.

public static T OpenByHandle<T>(IntPtr queueHandle) where T : MessageQueue
public static T OpenByHandle<T>(IntPtr queueHandle, IntPtr processHandle) where T : MessageQueue

As you can see, in this case you need an handle to a source process that owns the message queue, while the queue handle is the same returned by the Create() method.
Finally I’ve created a simple smart device project for testing this class library (Visual Studio 2008 / Framework 2.0 or 3.5) just refactoring the example proposed by the author of the MSDN article mentioned above.

You can download source code here.

Here’s a screenshot:

HTH

Posted in .NET Framework, Compact Framework | 5 Comments »

[ASP.NET MVC 2] Splitting DateTime in drop-down lists and model binding

Posted by dariosantarelli on December 26, 2010


OK this is not the classic DateTime picker bound to a textbox… with a jQuery calendar ;).
If you need a custom datetime editor template that splits the datetime parts in drop-down lists like this…

<%= Html.EditorFor(model => model.BirthDate, “Date”) %>

…or like this…


<%= Html.EditorFor(model => model.EventDateTime, “DateTime”) %>

…then this post may help you. As you should know, in ASP.NET MVC 2 the default model binder has some difficulties to combine splitted datetime parts in the View. So, if you need to define a DateTime property in your model and make a custom editor template that splits the DateTime parts in different controls (e.g. TextBox and/or DropDownList), first you should read this smart solution by Scott Hanselman. The idea is to separate the way we render the month field, the day field, the year field etc. from the mechanism that will assemble them back in a DateTime structure for model binding.
Starting from the Global.asax, the first thing to do is to register the Scott’s Custom Model Binder and then specify all the available options (the strings there are the suffixes of the fields in your View that will be holding the Date, the Time, the Day etc.)

ModelBinders.Binders[typeof(DateTime)]  = new DateTimeModelBinder()
{
  Date = "Date", // Date parts are not splitted in the View
                 // (e.g. the whole date is held by a TextBox  with id “xxx_Date”)
  Time = "Time", // Time parts are not  splitted in the View
                 // (e.g. the whole time  is held by a TextBox with id “xxx_Time”)
  Day = "Day",  
  Month = "Month",
  Year = "Year",
  Hour = "Hour",
  Minute = "Minute",
  Second = "Second"
};


Now, let’s have a look to template editors. In Views\Shared\EditorTemplates directory we can put two simple templates: Date.ascx and DateTime.ascx. The former renders only the drop-down lists for the date part of the DateTime structure (Month, Day, Year), while the latter renders the time part too. Here the code for Date.ascx:

<%@ Control Language="C#" Inherits="System.Web.Mvc.ViewUserControl<System.DateTime>" %>
<%@ Import Namespace="System.Threading" %>

<%= Html.DropDownListFor(dateTime => dateTime.Month, Enumerable.Range(1, 12).Select(i => new SelectListItem                          
{                              
  Value = i.ToString(),                              
  Text = Thread.CurrentThread.CurrentUICulture.DateTimeFormat.GetMonthName(i),                             
  Selected = (i == Model.Month && Model != DateTime.MinValue && Model != DateTime.MaxValue)                         
}),"-- Month --")%>  /

<%= Html.DropDownListFor(dateTime => dateTime.Day, Enumerable.Range(1, 31).Select(i => new SelectListItem                          
{                              
  Value = i.ToString(),                              
  Text = i.ToString(),                             
  Selected = (i == Model.Day && Model != DateTime.MinValue && Model != DateTime.MaxValue)                         
}), "-- Day --")%> /

<%= Html.DropDownListFor(dateTime => dateTime.Year, Enumerable.Range(DateTime.Now.Year-110, 110).Select(i => new SelectListItem                           
{                                                             
  Value = i.ToString(),                               
  Text = i.ToString(),                              
  Selected = (i == Model.Year && Model != DateTime.MinValue && Model != DateTime.MaxValue)                          
}), "-- Year --")%>

<%= Html.HiddenFor(dateTime => dateTime.Hour)%>
<%= Html.HiddenFor(dateTime => dateTime.Minute)%>
<%= Html.HiddenFor(dateTime => dateTime.Second)%>

That’s all!
Note that in the template editor above, the Hour, Minute and Second parts are rendered as HTML hidden fileds, because the Scott’s DateTimeModelBinder configured in the Global.asax expects a value for all the six parts of the splitted DateTime structure. It’s just a clean workaround to make the Scott’s model binder work without any change to the original code. In a real implementation hidden fields should be not required ;).

Now, what about validation? Well, both client-side and server-side validations are quite trivial: the server-side validation can be obtained through a custom ValidationAttribute that checks if the DateTime value is correct (e.g. the value should be not equal to DateTime.MinValue or DateTime.MaxValue).

[AttributeUsage(AttributeTargets.Field | AttributeTargets.Property, AllowMultiple = false, Inherited = true)]
public sealed class DateRequiredAttribute : ValidationAttribute
{       
   public DateRequiredAttribute() : base() { }

   public override string FormatErrorMessage(string name)
   {
     return string.Format(CultureInfo.CurrentUICulture, ErrorMessageString, name);
   }
  public override bool IsValid(object value)
   {
     DateTime dateTime = (DateTime)value;
     return (dateTime != DateTime.MinValue && dateTime != DateTime.MaxValue);           
   }
}

The corresponding client-side validation adapter can be implemented by deriving the DataAnnotationsModelValidator class. It allows us to specify a remote validation rule from the client. In this scenario, the part of the DateTime structure that could be validated is the Date part.
So, we can create a SplittedDateRequiredValidator in order to check if each drop-down is holding a valid value. To accomplish this requirement, a simple solution is to make the client-side validator aware of the IDs of the <select> elements holding the DateTime’s Month, Day and Year values.

public sealed class SplittedDateRequiredValidator : DataAnnotationsModelValidator<DateRequiredAttribute>
{
   private string _message;
   private string _dayField;
   private string _monthField;
   private string _yearField;

   public SplittedDateRequiredValidator(ModelMetadata metadata, ControllerContext context, DateRequiredAttribute attribute)
                                        : base(metadata, context, attribute)
   {
      _message = attribute.ErrorMessage;
       _dayField = metadata.PropertyName + "_Day";
       _monthField = metadata.PropertyName + "_Month";
       _yearField = metadata.PropertyName + "_Year";           
   }

   public override IEnumerable<ModelClientValidationRule> GetClientValidationRules()
   {
      ModelClientValidationRule rule = new ModelClientValidationRule
      {
         ErrorMessage = _message,
         ValidationType = "splittedDateRequiredValidator"               
      };

      rule.ValidationParameters.Add("dayFieldId", _dayField);
      rule.ValidationParameters.Add("monthFieldId", _monthField);
      rule.ValidationParameters.Add("yearFieldId", _yearField);

      return new[] { rule };
   }
}

Before looking at javascript validator code, let’s register the SplittedDateRequiredValidator as the client-side validation adapter for all model properties decorated with the DateRequiredAttribute. To accomplish that, we have to put the following line of code in the Global.asax…

DataAnnotationsModelValidatorProvider.RegisterAdapter(typeof(DateRequiredAttribute), typeof(SplittedDateRequiredValidator));


Finally, the client-side validator will evaluate the selected index of the drop-down lists in order to ensure that the user has selected a valid date (note that the isValidDate function simply checks if the users has specified an existing date).

Sys.Mvc.ValidatorRegistry.validators.splittedDateRequiredValidator = function (rule) {        
  var dayFieldId = rule.ValidationParameters.dayFieldId;    
  var monthFieldId = rule.ValidationParameters.monthFieldId;    
  var yearFieldId = rule.ValidationParameters.yearFieldId;    
  return function (value, context) {                
    var dayIdx = $get(dayFieldId).selectedIndex;        
    var monthIdx = $get(monthFieldId).selectedIndex;        
    var yearIdx = $get(yearFieldId).selectedIndex;        
    if (dayIdx === 0 || monthIdx === 0 || yearIdx === 0) return false;        
    else return isValidDate(parseInt($get(yearFieldId).value), monthIdx, dayIdx);     
  };
};


function
isValidDate(y, m, d) {
var date = new
Date(y, m – 1, d);
var convertedDate = “”
+ date.getFullYear() + (date.getMonth() + 1) + date.getDate();
var givenDate = “”
+ y + m + d;
return (givenDate == convertedDate);
}

Ok let’s put everything together!
Assuming that our model defines a property ”BirthDate” like this…

[DateRequired(ErrorMessage = “Invalid date. Please specify valid values!”)]
[DataType(DataType.Date)]
[
DisplayName(“Birthdate”
)]
public DateTime BirthDate { get; set; }

… if we put the following code in our View…

<% Html.EnableClientValidation(); %>


<%= Html.EditorFor(m => m.BirthDate, “Date”) %><br />
<%= Html.ValidationMessageFor(m => m.BirthDate)
%>

…the output would be, for example, the following…

HTH

Posted in ASP.NET MVC | Tagged: , , | 11 Comments »

[WPF] Binding multiple command parameters using MultiBinding

Posted by dariosantarelli on November 7, 2010


In this post, I’d like to show how we can pass multiple values into an ICommand implementation by using the CommandParameter property of an input control. This is useful especially in MVVM architectures, so that the View can interact with the ViewModel in a clean way, facing the fact that the Execute method of the ICommand interface allows only a single object.
A solution is to use the MultiBinding class which allows us to define a collection of Binding objects attached to the target CommandParameter property of our input control. In a concrete example, let’s consider a simple search box with an OK button and a checkbox “ignore case”. The OK button is bound to a custom FindCommand defined in the ViewModel.
When the user clicks on the OK button, we want two parameters to be passed to the command: the string to be searched and the “ignorecase” option. How can we bind these two parameters to the Button’s CommandParameter?
Well, first we have to create a class to hold the parameters.

public class FindCommandParameters
{
  public string Text { get; set; }
  public bool IgnoreCase { get; set; }
}

After that, we have to create a class that implements the IMultiValueConverter interface. This simply converts our multiple parameters into the class that we have defined before.

public class FindCommandParametersConverter : IMultiValueConverter
{ 
  public object Convert(object[] values, Type targetType, object parameter, System.Globalization.CultureInfo culture)
  {
    FindCommandParameters parameters = new FindCommandParameters(); 
    foreach (var obj in values)
    { 
       if (obj is string) parameters.Text = (string)obj;                
       else if (obj is bool) parameters.IgnoreCase = (bool)obj;
    } 
    return parameters;
  }
  public object[] ConvertBack(object value, Type[] targetTypes, object parameter, System.Globalization.CultureInfo culture)
  {
    throw new NotImplementedException();
  }
}

As you can see in the code above, we can iterate through the list of input values of the Convert method, checking their type, and then correctly assign the properties of the parameter class. Obviously you can implement different solutions (you always know the order of the parameters set in the XAML), but the most important thing at this point is that the return value of the Convert method is what will be passed as argument to the Execute method of our FindCommand.
To wire up the XAML to take advantage of this class, we have to include the <Button.CommandParameter> element.  This contains the <MultiBinding> element, which has the “Converter” attribute. In the code below, the converter type is added as a resource to the button to make this post easier to read, but convention usually dictates resources are added at the Window level to allow reuse and readability.
Under the MultiBinding.Bindings element, we add a <Binding> element for each parameter that we need to pass into the command.

<TextBox x:Name="txtFind" />
<CheckBox x:Name="chkFindIgnoreCase" Content="Ignore case" />
 <Button Command="{Binding FindCommand}" Content="OK">
  <Button.Resources>
    <ui:FindCommandParametersConverter x:Key="findCommandParametersConverter" />
  </Button.Resources>
  <Button.CommandParameter>
    <MultiBinding Converter="{StaticResource findCommandParametersConverter}">
      <MultiBinding.Bindings>
        <Binding ElementName="txtFind" Path="Text" />
        <Binding ElementName="chkFindIgnoreCase" Path="IsChecked" />
      </MultiBinding.Bindings>
    </MultiBinding>
  </Button.CommandParameter>
</Button>

The final step is to consume the FindCommandParameters object instance in our FindCommand’s CanExecute and Execute methods.

Posted in WPF | Tagged: , , | 1 Comment »

[C#] How to programmatically find a COM port by friendly name

Posted by dariosantarelli on October 18, 2010


When using the SerialPort.GetPortNames() method, you are querying the current computer for a list of valid serial port names. For example, you can use this method to determine whether “COM1” and “COM2” are valid serial ports in your computer. The port names are obtained from the system registry (if the registry contains stale or otherwise incorrect data then this method will return incorrect data). The limit of this approach is that you get just an array of port names (e.g. { “COM1”,”COM2” … }) and nothing else! If the com ports are physical, there’s no problem but what about virtual ports connected for example through an USB adapter? Well, you can determine if a port is valid but you don’t know exactly which COM number was assigned to your device. So you need more information! In the system Device Manager, you can see the COM port friendly name under the "Ports (COM & LPT)" heading. This means that the right COM port number can be found by using WMI 🙂
A solution to this need comes from WMI Code Creator tool which allows you to generate VBScript, C#, and VB .NET code that uses WMI to complete a management task such as querying for management data, executing a method from a WMI class, or receiving event notifications using WMI.
A suitable WMI query is “SELECT * FROM Win32_PnPEntity WHERE ConfigManagerErrorCode = 0”.
Here is a code example showing how to enumerate the information of the COM ports currently available on your system (including the friendly name of course) by executing the query above.

using System.Management;

internal class ProcessConnection {

   public static ConnectionOptions ProcessConnectionOptions()

   {

     ConnectionOptions options = new ConnectionOptions();

     options.Impersonation = ImpersonationLevel.Impersonate;

     options.Authentication = AuthenticationLevel.Default;

     options.EnablePrivileges = true;

     return options;

   }


   public static ManagementScope ConnectionScope(string machineName, ConnectionOptions options, string path)

   {

     ManagementScope connectScope = new ManagementScope();

     connectScope.Path = new ManagementPath(@"\\" + machineName + path);

     connectScope.Options = options;

     connectScope.Connect();

     return connectScope;

   }

}


public class COMPortInfo

{

   public string Name { get; set; }

   public string Description { get; set; }


   public COMPortInfo() { }     


   public static List<COMPortInfo> GetCOMPortsInfo()

   {

     List<COMPortInfo> comPortInfoList = new List<COMPortInfo>();


     ConnectionOptions options = ProcessConnection.ProcessConnectionOptions();

     ManagementScope connectionScope = ProcessConnection.ConnectionScope(Environment.MachineName, options, @"\root\CIMV2");


     ObjectQuery objectQuery = new ObjectQuery("SELECT * FROM Win32_PnPEntity WHERE ConfigManagerErrorCode = 0");

     ManagementObjectSearcher comPortSearcher = new ManagementObjectSearcher(connectionScope, objectQuery);


     using (comPortSearcher)

     {

       string caption = null;

       foreach (ManagementObject obj in comPortSearcher.Get())

       {

         if (obj != null)

         {

           object captionObj = obj["Caption"];

           if (captionObj != null)

           {

              caption = captionObj.ToString();

              if (caption.Contains("(COM"))

              {

                COMPortInfo comPortInfo = new COMPortInfo();

                comPortInfo.Name = caption.Substring(caption.LastIndexOf("(COM")).Replace("(", string.Empty).Replace(")",

                                                     string.Empty);

                comPortInfo.Description = caption;

                comPortInfoList.Add(comPortInfo);

              }

           }

         }

       }

     } 

     return comPortInfoList;

   }
}

Finally you can easily get the com port list in this way…

foreach (COMPortInfo comPort in COMPortInfo.GetCOMPortsInfo())

{

  Console.WriteLine(string.Format("{0} – {1}", comPort.Name, comPort.Description));

}

Other solutions?

  • A first alternative is SetupAPI. You can find a complete example here.
  • Secondly, you can try to use DevCon (a Microsoft tool that allows "device management" from the command line): you could use the

    System.Diagnostics.Process class to parse the standard output of the command line “>devcon find =ports”.

Posted in .NET Framework, C# | Tagged: | 36 Comments »

[C#] Byte Array to Hex string

Posted by dariosantarelli on October 16, 2010


There are a lot of ways of converting a byte array to the corresponding hexadecimal string. I usually adopt the BitConverter class in order to optimize the readibility of code, but starting from the .NET Framework 3.0 the same task can be obtained using a single line of code through extensions methods:

[TestMethod]
public void BitConverterVsStringConcatAndExtensionMethod()
{
 
byte[] bytes = new byte[] { 0x00,0xAA,0xB0,0xC8,0x99,0x11,0x01,0x02 … };
 
string expectedResult = "00AAB0C899110102…";
 
 
string result1 = BitConverter.ToString(bytes).Replace("-",string.Empty);
 
 
string result2 = string.Concat(bytes.Select(b => b.ToString("X2")));

 
Assert.AreEqual(expectedResult, result1);
 
Assert.AreEqual(expectedResult, result2);
}

OK no performance issue has been discussed. Aren’t you satisfied? Follow this thread !!! (4 years of discussion :D)

Posted in .NET Framework, C# | Leave a Comment »

[ASP.NET MVC 2] Handling timeouts in asynchronous controllers

Posted by dariosantarelli on October 16, 2010


An important feature of the ASP.NET MVC framework is the possibility of creating asynchronous controllers. As in Asynchronous Pages in ASP.NET 2.0, the aim is to avoid a “thread starvation” in your web application, preventing web clients to receive a bad 503 status code (Server too busy). In fact, when the Web Server receives a request, a thread is taken from the application threadpool mantained by the .NET Framework. In a synchronous scenario, this thread lives (and can’t be reused) until all the operations complete. Well, asynchronous pipeline is better when the logic creates bottlenecks waiting for network-bound or I/O-bound operations. Considering that an asynchronous request takes the same amount of time to process as a synchronous request, minimizing the number of threads waiting for blocking operations is a good practice, particularly appreciated by your Web server when it’s bombarded by hundreds of concurrent requests. Now, have a look to this simple asynchronous controller:

public class CustomersController : AsyncController

{

   [AsyncTimeout(10000)]

   public void ListAsync()

   {

     AsyncManager.OutstandingOperations.Increment();

     Task.Factory.StartNew(() =>

     {

       try { AsyncManager.Parameters["result"] = new MyServiceClient().GetCustomers(); }

       catch (Exception ex) { … }

       finally { AsyncManager.OutstandingOperations.Decrement(); }

     );

   }


   public ActionResult ListCompleted(List<Customer> result)

   {

     return View("List", result);

   }

   …


   protected override void OnException(ExceptionContext filterContext)

   {

     if (filterContext.Exception is TimeoutException)

     {

       filterContext.Result = RedirectToAction("TryAgainLater");

       filterContext.ExceptionHandled = true;

     }           

     base.OnException(filterContext);

   }   

}

By default, ASP.NET MVC won’t call the ListCompleted method until the AsyncManager associated with the request says that there is no outstanding asynchronous operations. But it’s possible that one or more asynchronous operations might never complete!!! Moreover, if the callback for one of your asynchronous operations throws an exception before it calls the AsyncManager.OutstandingOperations.Decrement() method, the request will keep waiting a decrement until it times out! So, putting the AsyncManager.OutstandingOperations.Decrement() call inside a finally block would be fine :).
The AsyncManager object has a built-in default timeout set to 45 seconds, so if the count of outstanding operations doesn’t reach zero after this long, the framework will throw a System.TimeOutException to abort the request. If you want to set a different timeout you can use the AsyncTimeout filter for specifying a different duration. If you want to allow asynchronous operations to run for an unlimited period, then use the NoAsyncTimeout filter instead.

Finally, we have to say that most applications will have an ASP.NET global exception handler that will deal with timeout exceptions in the same way as other unhandled exceptions. But if you want to treat timeouts in a custom way, providing a different feedback to the user, you can create your own exception filter or you can override the controller’s OnException() method (e.g. to redirect users to a special “Try again later” page).

Posted in ASP.NET | Tagged: , | 1 Comment »

Web Development Helper

Posted by dariosantarelli on June 23, 2008


Web Development Helper is a free browser extension for Internet Explorer that provides a set of tools and utilities for the Web developer, esp. Ajax and ASP.NET developers. The tool provides features such as a DOM inspector, an HTTP tracing tool, and script diagnostics and immediate window. Web Development Helper works against IE6+, and requires the .NET Framework 2.0 or greater to be installed on the machine.

Very cool 😉

Posted in Web Development | 1 Comment »

Easyfrom Database Convert

Posted by dariosantarelli on June 22, 2008


If you are migrating your database across different platforms or applications, then you know that it can not be done by simple copy-and-paste operations. To forget about difficulties associated with database conversion, you should try ESF Database Convert. This wizard-based tool addresses almost any database conversion need. Advanced converting mechanisms of the tool provide smooth conversion directly from/to any of the following database formats: Oracle, MySQL, SQL Server, PostgreSQL, Visual Foxpro, FireBird, InterBase, Access, Excel, Paradox, Lotus, dBase, Text and others(e.g.: Access to Oracle, Oracle to SQL Server, SQL Server to MySQL, MySQL to PostgreSQL…). Also you can convert any format of a database with ODBC DSN.
ESF Database Convert includes the support of table CLOB/BLOB, Primary/Foreign Keys, Indexes, Auto-ID and maps table and field names/types in converting. It provides all the required conversion options, taking into account the peculiarities of both input and output database formats. You can convert data exactly the way you want it.
The tool comes with the batch conversion mode that can enhance productivity by speeding up the entire conversion process. Our users regularly convert multi-million records databases using our software.

Posted in Blogroll | Leave a Comment »

Programming languages history

Posted by dariosantarelli on June 22, 2008


Here you can find an interesting diagram of programming languages history. Years go by, but surprisely you can see how apparently incompatible paths (OO and functional programming) are slowly fusing in time.  For about 50 years, computer programmers have been writing code. New technologies continue to emerge, develop, and mature. Now there are more than 2,500 documented programming languages!

Here a preview 😉

diagram

Moreover, O’Reilly has produced a poster called History of Programming Languages  which plots over 50 programming languages on a multi-layered, color-coded timeline.

Posted in Programming | Leave a Comment »